
Are Stickers Safe for Laptops? Safety Guide
You’ve got the stickers. You’ve got the laptop. And somewhere between peeling that first backing and pressing the sticker down, a small voice in your head asks: wait, is this actually safe?
It’s a fair question. Laptops are expensive. Some of them are very expensive. The idea of putting anything adhesive on a machine that cost you a month’s salary, or that your employer handed you on day one, deserves more than “yeah, probably fine.”
So let’s answer it properly.
The short version: yes, stickers are safe for laptops, but the word “safe” comes with conditions attached. The type of sticker matters. The surface you’re applying to matters. Where you place them on the laptop matters. And how you remove them when the time comes matters more than almost anything else.
Get those things right and your laptop lid will look exactly as expressive and personality-driven as you want it to be, without any damage to the hardware or the finish underneath. Get them wrong and you’re potentially looking at adhesive residue, surface scuffing, or, in the worst case, thermal issues from blocking ventilation.
This guide covers all of it in technical detail. By the end, you’ll know exactly what’s safe, what isn’t, why, and how to handle every scenario you’re likely to encounter as a developer who puts stickers on their machine.
And once you’ve got the safety picture sorted, our ultimate guide to laptop stickers for programmers covers everything from design ideas to where to buy, the full picture in one place.
The Core Question: What Makes a Sticker “Safe” for a Laptop?
Defining Safety in the Context of Laptop Stickers
When developers ask “are stickers safe for laptops,” they’re usually worried about one or more of these specific outcomes:
- Physical damage to the surface finish – scuffing, scratching, or permanently altering the laptop’s exterior appearance
- Adhesive residue – sticky, gummy residue left behind after removal that’s difficult to clean
- Thermal or performance issues – overheating caused by blocking ventilation
- Warranty implications – whether stickers void manufacturer warranty coverage
- Long-term adhesive bonding – stickers that bond so strongly over time that removal causes damage
Each of these concerns is legitimate and each has a real answer. We’ll work through them systematically.
The Sticker Safety Spectrum
Not all stickers carry the same risk profile. Think of laptop sticker safety as a spectrum:
Lowest risk: High-quality die-cut vinyl stickers with pressure-sensitive adhesive, applied to aluminum surfaces on appropriate areas of the lid, removed using correct technique.
Moderate risk: Vinyl stickers applied to soft-touch matte finishes, or stickers left on for extended periods (years rather than months) on any surface type.
Higher risk: Paper stickers, stickers with permanent or aggressive adhesive, stickers applied over ventilation areas, or any sticker removed by pulling quickly and forcefully from a cold surface.
Genuine damage territory: Covering intake or exhaust vents with any sticker material, using solvent-based cleaners on sensitive finishes to remove residue, or applying stickers to hot surfaces immediately after the laptop has been running.
Understanding where your specific situation falls on this spectrum is the foundation of safe sticker practice.
Sticker Types and Their Safety Profiles
Vinyl Stickers – The Safe Standard
Quality vinyl stickers are the baseline recommendation for any laptop application, and for good reason. Vinyl as a sticker material has several properties that make it well-suited to laptop surfaces:
Flexibility: Vinyl conforms slightly to surface contours and edges, creating a more complete bond that’s less prone to edge-lifting than rigid materials.
Durability: Properly manufactured vinyl stickers resist heat, moisture, UV exposure, and the daily friction of opening and closing a laptop bag. They don’t deteriorate in ways that can complicate removal.
Controlled adhesive: Quality vinyl stickers use pressure-sensitive adhesive (PSA) – a class of adhesive that bonds through applied pressure rather than chemical reaction. PSA bonds are strong enough to hold securely but don’t form the permanent chemical bonds of super glue or epoxy. This is what makes clean removal possible.
Laminate protection: Most quality vinyl stickers have a laminate coating over the printed surface that protects the design and adds an additional layer between the sticker and the environment. This laminate also tends to strengthen the sticker’s structural integrity during removal, reducing the chance of it tearing and leaving adhesive behind.
Look for stickers described as “die-cut vinyl,” “weatherproof vinyl,” or “premium vinyl”, these terms consistently indicate the quality tier you want for laptop use. TechGeeksApparel’s programmer sticker collection uses this standard, weatherproof vinyl built for lasting use on exactly the kind of surfaces developers care about.
Paper Stickers – What to Avoid
Paper stickers are the budget tier of the sticker world and they behave accordingly on laptop surfaces. Several specific problems:
Moisture sensitivity: Paper absorbs ambient moisture from the environment and from your hands. On a laptop lid that sees daily handling, paper stickers begin to deteriorate at the edges relatively quickly, lifting, bubbling, and eventually peeling in an unsatisfying way.
Poor adhesive control: Paper stickers often use lower-quality adhesive that either bonds too aggressively (making clean removal difficult) or not aggressively enough (lifting prematurely). Neither is ideal on expensive hardware.
Residue on removal: As paper stickers age and the paper substrate deteriorates, the adhesive often separates from the sticker rather than lifting cleanly with it. This leaves adhesive residue on the surface without the sticker to help remove it.
Degraded appearance: Even when they stay on, paper stickers fade, yellow, and lose visual quality faster than vinyl. The design you put on your laptop looks noticeably worse within months rather than years.
The general rule: if a sticker pack feels flimsy and papery when you handle it, it’s not appropriate for laptop use. Save those for notebooks, water bottles you don’t care about, or the back of a phone case.
Holographic and Specialty Stickers
Holographic stickers, those iridescent, rainbow-shifting designs that look incredible on dark laptop lids, are almost always vinyl-based and carry the same safety profile as standard vinyl. The holographic finish is a surface treatment, not a different material category.
Specialty materials like fabric stickers, foam stickers, or anything with significant texture or three-dimensional elements are less suited to laptop use simply because their irregular surfaces create more opportunities for edge-lifting and don’t clean as easily during removal.
“Auto Stickers” – A Common Question
People often ask whether automotive vinyl stickers (the kind used on cars) are safe for laptops. The answer is: technically yes in terms of material safety, but with caveats.
Automotive vinyl is designed for outdoor use on curved, painted metal surfaces. It uses stronger adhesive than laptop-appropriate stickers because it needs to survive car washes, UV exposure, and temperature extremes. That stronger adhesive means it bonds more aggressively to laptop surfaces and is significantly harder to remove cleanly, especially from matte finishes.
If an auto sticker happens to be on quality vinyl with a clean-removal adhesive, it might be fine. But the category as a whole uses more aggressive adhesive than you want on a laptop. When in doubt, stick to stickers specifically manufactured for indoor, consumer-device use.
The Ventilation Question – The Most Important Safety Issue
Why Covering Vents Is the One Real Danger
Of all the sticker safety concerns, this is the only one that creates genuine risk of hardware damage. Everything else, surface scuffing, adhesive residue, finish alteration, is cosmetic. Thermal issues caused by blocked ventilation can actually damage components.
Modern laptops generate significant heat during normal operation. Processors, GPUs, and SSDs all produce heat that the cooling system must remove efficiently. That system typically involves:
- Intake vents that draw cool ambient air into the chassis (usually on the bottom, sometimes on the sides)
- Exhaust vents that expel hot air (usually at the rear or sides, sometimes through the keyboard deck)
- Heat pipes and fans that move heat from components to the vents
Covering these vents, even partially, restricts airflow and forces the cooling system to work harder to maintain safe operating temperatures. The result can be:
- Thermal throttling: The processor automatically reduces its clock speed to generate less heat, directly reducing performance
- Sustained high temperatures: Extended operation at elevated temperatures accelerates component aging
- Fan noise: Fans spin faster and louder to compensate for restricted airflow
- In extreme cases: Component damage from sustained overheating, though modern thermal protection systems usually prevent the worst outcomes
How to Identify Your Laptop’s Vents
Before applying any sticker to any part of your laptop, take two minutes to identify where the vents actually are:
Check the bottom panel: Most laptop intake vents are here, look for grilles, slots, or perforated areas. These should never have stickers applied. This is also where the cooling fans usually sit.
Check the rear edge: Many laptops exhaust hot air from the rear hinge area. The back edge of the laptop, especially near where the screen meets the base, often has exhaust vents.
Check the sides: Some laptops vent from the left or right sides. Less common but worth checking.
The lid is almost always safe: The display lid, where developers put stickers, is almost universally vent-free. It’s a structural panel housing the screen; there’s no thermal management happening there. This is why sticker culture focuses on the lid.
When in doubt, check your model’s specifications. Your laptop manufacturer’s support page or user manual will show the thermal design, including vent locations. Two minutes of research prevents potential hardware issues.
The Bottom of the Laptop – Keep It Clear
Even if you’ve confirmed no vents on the bottom of your specific model, it’s good practice to keep the entire bottom of the laptop sticker-free. The bottom panel often houses cooling elements even where there are no visible vents, and airflow around the bottom of the device contributes to overall thermal management.
Keep your stickers on the lid. That’s the safe zone.
Surface Compatibility – How Different Finishes Respond to Stickers
Aluminum – The Most Forgiving Surface
Anodized aluminum, the premium material used on Apple MacBooks, Dell XPS lids, and many other high-end laptops, is the most sticker-friendly surface available. The hard, smooth, non-porous nature of anodized aluminum means:
- Stickers apply cleanly with a strong, even bond
- The surface doesn’t absorb adhesive over time
- Quality vinyl stickers remove without leaving residue in the vast majority of cases
- The finish is durable enough to handle repeated application and removal cycles
If your laptop has an aluminum lid, you have the ideal canvas for sticker culture. Apply with confidence.
Hard Plastic – Reliable and Forgiving
Hard polycarbonate or ABS plastic lids, common on mid-range laptops across all brands, handle stickers well. The smooth surface bonds cleanly and releases reasonably well during removal. Slightly more prone to minor adhesive residue than aluminum, but nothing that isopropyl alcohol can’t address.
Soft-Touch Matte Coating – Handle With Care
This is the surface that requires the most attention. Soft-touch matte coating, the velvety, rubberized finish used on many Dell Inspiron, Lenovo IdeaPad, HP Pavilion, and similar consumer laptops, is genuinely more sensitive to adhesive interaction than harder surfaces.
Specific concerns with soft-touch matte:
Adhesive bonding: The slightly porous, textured nature of soft-touch coating means adhesive can penetrate the surface texture more deeply than on smooth surfaces, making removal harder as time passes.
Finish sensitivity: The coating itself can be damaged by aggressive removal or certain cleaning chemicals. Pulling a sticker quickly from a cold soft-touch surface can lift or scuff the coating.
Residue interaction: Adhesive residue on soft-touch matte is harder to clean than on aluminum, isopropyl alcohol works but must be applied gently without scrubbing.
Safe practice for soft-touch matte surfaces:
- Use only high-quality vinyl with clean-removal adhesive
- Never leave stickers in place for years without checking their removal behavior
- Always remove with heat and extreme patience
- Test adhesive behavior on a hidden corner of the lid before full application if you’re uncertain
Our dedicated post on laptop stickers for Dell covers Dell’s specific surface types in detail, including model-by-model guidance for Inspiron, XPS, and Latitude.
Carbon Fiber Texture – The Nuanced Case
Carbon fiber weave lids, found on select premium laptops, present a unique challenge. The textured surface means a flat sticker doesn’t bond completely across its entire surface; adhesive contacts the raised peaks of the weave but not the valleys. This creates:
- Slightly weaker overall adhesion (the sticker may lift at edges faster)
- More effort required during application to press adhesive into the texture
- Generally clean removal since the incomplete bonding means less total adhesive is making contact
Use firm application pressure on carbon fiber surfaces and pay extra attention to edges during the initial application.
Glossy Painted Surfaces
Less common on modern laptops but found on some gaming laptops and older consumer models. High-gloss painted surfaces are moderately sticker-friendly but carry one specific risk: aggressive sticker removal on painted surfaces can lift paint if the bond is strong enough. Use heat, go slow, and be extra careful with any sticker that’s been on a painted surface for an extended period.
Heat and Environmental Factors
Does Laptop Heat Affect Sticker Adhesive?
The lid of a laptop doesn’t typically reach temperatures that compromise vinyl adhesive, the components generating heat are in the base unit, and even a warm-running laptop rarely heats the display lid above 35–40°C (95–104°F) under normal use. Quality vinyl stickers are rated for significantly higher temperatures than this.
However, there are environmental heat scenarios worth considering:
Leaving a laptop in a hot car: Temperatures inside a parked car in summer can reach 70°C+ (160°F+) in some climates. At these temperatures, sticker adhesive can soften significantly, potentially causing the sticker to shift position, leaving residue, or, in extreme cases, bonding more aggressively to the surface. Don’t leave your stickered laptop in a hot car.
Direct sun exposure during use: Using a laptop in direct sunlight for extended periods can heat the lid surface. Not usually a sticker safety issue in practice, but worth being aware of for long outdoor sessions.
Using heat for application: Gently warming a laptop surface before applying a sticker (to around room temperature from cold) can actually improve adhesion in cold environments. This is a benefit, not a risk.
Cold Temperatures and Sticker Application
Applying stickers to a cold laptop surface is the scenario most likely to result in poor initial adhesion and premature edge-lifting. Cold temperatures make adhesive less pliable and reduce its ability to flow into surface micro-textures.
Always apply stickers at room temperature. If your laptop has been in a cold bag or car, give it 15–20 minutes to warm up before applying anything.
Safe Application Technique – Step by Step
The Right Process Makes All the Difference
Application technique significantly affects both how good the sticker looks and how easily it comes off later. Here’s the complete safe application process:
Step 1 – Surface preparation Clean the application area with a microfiber cloth to remove dust. Follow with a second cloth lightly dampened with 70%+ isopropyl alcohol to remove oils and fingerprints. Allow 5 full minutes to dry completely. This step is the most skipped and the most important, contaminated surfaces cause adhesion failures and edge lifting.
Step 2 – Plan before you peel Lay out your stickers on a flat surface to confirm your layout. Photograph it. Make sure no planned sticker position overlaps with any vent or functional area of the laptop. Confirm sizing looks right before committing to anything.
Step 3 – Peel carefully When peeling the backing, hold the sticker by its edges rather than touching the adhesive surface. Fingerprints and skin oils on the adhesive reduce bonding quality. For large stickers, peel the backing from one corner and fold it back gradually as you lower the sticker into position.
Step 4 – Position before full contact For stickers larger than 2 inches, position the sticker above the surface before making full contact. Confirm alignment carefully, you typically get one chance before the adhesive grabs the surface significantly.
Step 5 – Apply from center outward Once positioned, press the center of the sticker firmly first, then use a credit card, squeegee, or your thumb to press outward toward the edges, working out any air bubbles as you go.
Step 6 – Edge pressing Give special attention to the edges of the sticker, pressing firmly all around the perimeter. Edges are where peeling starts, good initial edge bonding extends sticker life significantly.
Step 7 – Allow curing time Leave the laptop closed or undisturbed for at least an hour after application. Adhesive continues to bond and strengthen during this initial period.
Safe Removal Technique – The Process That Prevents Damage
How to Remove Laptop Stickers Without Damage
Removal is where most sticker damage actually happens. The correct technique is simple but requires patience, the one quality most developers struggle with during a debugging session, but absolutely essential here.
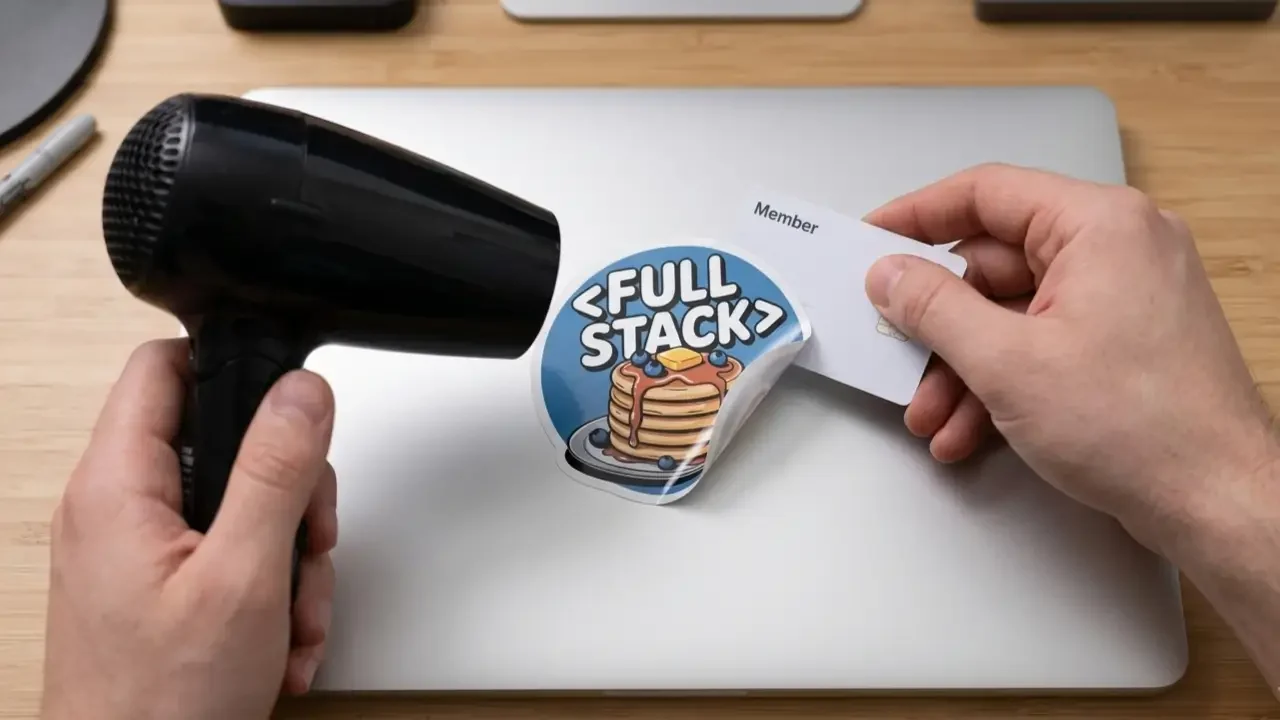
Step 1 – Apply gentle heat Hold a hairdryer on its lowest heat setting approximately 6–8 inches from the sticker surface. Move it slowly over the sticker for 20–30 seconds. You’re softening the adhesive to its most pliable state, not melting the sticker or heating the laptop dangerously. The sticker should feel warm but not hot.
Step 2 – Lift from a corner Use a fingernail, a plastic card edge, or a dedicated plastic prying tool (never metal, metal can scratch) to gently lift one corner of the sticker. If you feel significant resistance, apply more heat and try again. Don’t force it.
Step 3 – Peel at a shallow angle Once a corner is lifted, peel the sticker back at an angle as close to parallel with the surface as possible, almost flat against the lid. This shallow angle minimizes the force applied to the surface coating compared to pulling straight up.
Step 4 – Go slow and steady The ideal removal pace is slower than feels natural. If you feel resistance at any point, stop, apply more heat, wait a few seconds, and continue. Resistance means adhesive is holding, forcing it is how surfaces get damaged.
Step 5 – Address residue immediately If any adhesive residue remains after the sticker is removed, address it immediately while it’s still warm and pliable. Apply a small amount of isopropyl alcohol to a soft microfiber cloth and gently dab and wipe the residue, don’t scrub, especially on soft-touch surfaces. Multiple gentle passes work better than aggressive scrubbing.
Step 6 – Final clean Wipe the entire area with a clean, dry microfiber cloth to remove any remaining cleaner and check for complete residue removal.
Dealing With Stubborn Residue
Sometimes, usually with cheaper stickers or stickers left on for a very long time, residue is more stubborn than isopropyl alcohol alone can address. Options in order of surface-friendliness:
Isopropyl alcohol (70%+): First choice. Safe for aluminum, hard plastic, and most finishes. Apply to cloth, never directly to the laptop.
Goo Gone (original formula): Effective on aluminum and hard plastic. Test in an inconspicuous spot first on any matte or soft-touch surface, some formulas can affect these coatings.
WD-40 (used sparingly): The petroleum distillates in WD-40 dissolve most adhesive residues. Works on aluminum but can leave an oily film that requires cleaning with isopropyl alcohol afterward. Not recommended for soft-touch surfaces.
What to absolutely avoid: Acetone, nail polish remover, paint thinner, bleach, or any solvent-based cleaner not specifically designed for use on electronics. These can dissolve surface coatings, strip anodizing, or damage plastics irreparably.
Do Laptop Stickers Affect Resale Value?
The Honest Answer
Yes, in most cases, heavily stickered laptops have lower resale value than clean ones. Buyers in the second-hand market generally prefer a blank canvas they can personalize themselves, and there’s always uncertainty about what might be under the stickers.
However, the impact is often smaller than people assume, particularly for:
- Older laptops where resale value is already low
- Laptops with stickers that have been cleanly applied and removed
- Machines where the underlying surface is in perfect condition beneath the stickers
If resale value matters to you, the practical approach is to use high-quality vinyl stickers, remove them carefully before selling, and address any residue completely. A clean aluminum lid after sticker removal typically shows no evidence that stickers were ever there.
For a company-provided laptop that will eventually be returned to IT, keeping your sticker collection to the lid only and using quality vinyl ensures a clean handoff when the time comes.
Stickers and Laptop Warranties
What Actually Gets Covered
Stickers applied to the external lid of a laptop do not void manufacturer warranties for hardware defects in the vast majority of cases. Warranty coverage applies to manufacturing defects in components, a sticker on the lid has no bearing on whether a faulty SSD, display, or battery gets covered.
Where warranty complications can arise:
Stickers that cause heat damage from blocking vents: This would be a user-caused damage scenario, not a manufacturing defect, and wouldn’t be covered regardless of sticker involvement.
Surface damage caused by improper sticker removal: Cosmetic damage caused by the user is typically excluded from standard hardware warranties. Remove correctly.
Stickers applied over serial numbers or service tags: Some manufacturers require the service tag to be legible for warranty service. Keep these areas clear.
Modified internal components: Irrelevant to stickers, but worth noting, if sticker application is part of a pattern of unauthorized hardware modifications, it could complicate warranty claims in some edge cases.
The practical guideline: keep stickers on the lid, keep service tags clear, remove cleanly when needed, and you’ll have no warranty issues.
Build Your Sticker Setup With Confidence
Now that the safety picture is completely clear, the fun part: actually building your sticker collection.
TechGeeksApparel’s programmer sticker packs are built with exactly the material standards this guide recommends, quality vinyl, weatherproof construction, designed for the surfaces developers actually use. The designs cover the full spectrum of developer culture, from web development and network engineering humor to general coding jokes that land across every specialty.
And stickers are just the beginning of the developer aesthetic. A developer desk mat protects your workspace while looking sharp. A programmer mug powers the sessions. A funny developer t-shirt or geek hoodie carries the same energy beyond the desk. And tech wall art and posters complete the environment everything happens in.
For design inspiration before you buy, our post on 50+ laptop sticker ideas for developers has everything organized by category and aesthetic. And for the full sourcing breakdown across platforms and price ranges, our guide on where to get the best laptop stickers covers every option worth knowing.
Conclusion – Safe Stickering Is Just Informed Stickering
Are stickers safe for laptops? The answer is a confident yes, with a clear understanding of what “safe” actually requires. Use quality vinyl. Keep vents clear. Know your surface type. Apply at room temperature with proper technique. Remove slowly with gentle heat. Clean residue with the right products.
That’s the entire safety checklist. None of it is complicated. All of it is achievable in five minutes of attention before you start applying and five minutes of patience when you eventually remove.
The developers who have problems with laptop stickers are almost always the ones who used cheap paper stickers, covered something they shouldn’t have, or tried to rip a sticker off a cold laptop at speed. Avoid those three things and you’ll be stickering laptops without incident for the rest of your career.
Now go make that lid look like yours.
Frequently Asked Questions
Are vinyl stickers safe for all laptop surfaces?
Quality vinyl stickers with pressure-sensitive adhesive are safe for aluminum, hard plastic, and most laptop surfaces when applied and removed correctly. Soft-touch matte finishes require more care, use clean-removal vinyl and always remove slowly with gentle heat. Our guide on laptop stickers for Dell covers matte surface guidance in detail for one of the most common laptop brands with soft-touch finishes.
Can laptop stickers cause overheating?
Only if they cover ventilation slots, which are almost never located on the display lid where stickers go. Keep stickers on the lid, check your specific model’s vent locations before applying anything near the base unit, and never put stickers on the bottom of the laptop where intake vents are typically located. The lid itself is thermally safe for sticker application.
How do you remove laptop stickers without leaving residue?
Apply gentle heat from a hairdryer on low for 20–30 seconds, then peel slowly from one corner at a shallow angle parallel to the surface. For any residue that remains, apply isopropyl alcohol (70%+) to a microfiber cloth and gently wipe, don’t scrub. Multiple gentle passes beat aggressive scrubbing every time.
Do laptop stickers void the warranty?
In the vast majority of cases, no. Standard hardware warranties cover manufacturing defects, a sticker on the exterior lid doesn’t affect that coverage. Keep service tags and serial numbers clear and uncovered, remove stickers cleanly when returning company devices, and don’t cover any ventilation areas. See our complete guide to laptop stickers for programmers for more on warranty considerations.
What is the safest type of sticker to put on a laptop?
Die-cut vinyl stickers with a laminate coating and pressure-sensitive adhesive, specifically those marketed as “clean removal,” “repositionable,” or “weatherproof vinyl.” These bond firmly enough to stay put under daily use but release cleanly without leaving residue. TechGeeksApparel’s programmer sticker packs use this standard and are designed specifically for the surfaces developers care about.
![A clean flat lay of nerdy gift ideas under $50, featuring a "World's [0] Programmer" t-shirt, a "I Learned Patience the Hard Way" mug, mechanical keyboard keycaps, and tech-themed books](https://techgeeksapparel.com/wp-content/uploads/2026/06/nerdy-gift-ideas-under-50-programmer-essentials.webp)